Like的世界

个人总结与随想

Std::forward_list 简介

| Comments

std::forward_list 为 C++ 11 STL 的 单向 链表:

  • 仅记录了首指针,未记录尾指针和链表长度,即无 push_backsize 方法。
  • 相比 std::list (双向链表,以下简化为 list
    • 节约内存空间
    • 仅能 顺序访问 ,无法 倒序访问
    • forward_list::sort 时间复杂度 O(n log n) ,但效率不如 list::sort ,尤其链表包含大量元素时。

forward_listlist 大部分方法相同,这里仅介绍 forward_list 不具备的能力。

顺序插入

因无 forward_list::push_back 方法,顺序插入 forward_list 一组元素得依靠调用者 自行 保存尾指针。

1
2
3
4
5
6
forward_list<int> fl;
auto iter = fl.before_begin();

for (int i = 0; i < 9; ++i) {
  iter = fl.insert_after(iter, i);
}

before_begin 返回首元素之前的元素(placeholder)。该元素实际不存在,访问它将导致未定义行为。

顺序复制

  • back_inserter 返回的 std::back_insert_iterator 要求容器实现了 push_back 方法。
  • inserter 返回的 std::insert_iterator 要求容器实现了 insert 方法。

显然,两者皆不适用于 forward_list ,然 inserter 最接近:
1
2
3
4
forward_list<int> fl;
vector<int> v{1, 2, 3, 4, 5, 6};

copy(v.begin(), v.end(), inserter(fl, fl.before_begin()));

为使上述代码能被编译和运行,须偏特化 std::insert_iterator :

1
2
3
4
5
6
7
8
9
10
11
12
13
14
15
16
17
18
19
20
21
22
23
24
25
26
27
28
29
30
31
32
33
34
35
36
namespace std {

template <typename T>
class insert_iterator<forward_list<T> >:
    public iterator<output_iterator_tag, void, void, void, void>
{
public:
    typedef forward_list<T> container_type;
    typedef typename container_type::iterator iterator_type;

    insert_iterator(container_type& c, iterator_type i):
        container_(c), iter_(i)
    {
    }

    insert_iterator& operator = (const typename container_type::value_type& v)
    {
        iter_ = container_.insert_after(iter_, v);
        return *this;
    }

    insert_iterator& operator = (const typename container_type::value_type&& v)
    {
        iter_ = container_.insert_after(iter_, std::move(v));
        return *this;
    }

    insert_iterator& operator * () { return *this; }
    insert_iterator& operator ++ () { return *this; }
    insert_iterator& operator ++ (int) { return *this; }
protected:
    container_type& container_;
    iterator_type iter_;
};

} // namespace std

此法不支持让用户定义 forward_list 的 allocator 。

完美办法为重新实现 forward_list_insert_iteratorforward_list_inserter

求长度

forward_list 未保存长度——无 size 方法,故须 O(n) 时间复杂度的 std::distance 计算长度:

1
2
forward_list<int> fl{1, 2, 3, 4, 5, 6};
auto size = std::distance(fl.begin(), fl.end());

forward_list::empty (长度是否为 0 )的时间复杂度 O(1)

值得一提 boost::slist 高度相似于 forward_list ,但前者保存长度,即 boost::slist::size 方法时间复杂度 O(1)

通过 LIEF 修改 ELF 解决 Glibc 兼容性问题

| Comments

数月前,我读了 Linux 修改 ELF 解决 glibc 兼容性问题 ,颇受启发,但暂无用武之地。

最近,我遇到了几乎一样的问题,即 clock_gettime 兼容性。

最小化问题

为了将问题最小化,这里我以 hello.c 模拟该问题:

1
2
3
4
5
6
7
8
9
#include <stdio.h>
#include <time.h>

int main() {
    struct timespec ts;
    clock_gettime(CLOCK_REALTIME, &ts);
    printf("%lu, %ld\n", ts.tv_sec, ts.tv_nsec);
    return 0;
}

在 Ubuntu 20.04 中,用系统内置 GCC 9.3.0 构建它:

1
gcc -fno-stack-protector -o hello hello.c -s
  • -fno-stack-protector : 禁用 stack 保护特性。目的为最小化未定义符号,最小化问题场景。
  • -s : 除去调试相关符号,目的同上。

通过 readelf -sV hello 展示其符号:

1
2
3
4
5
6
7
8
9
10
11
12
13
14
15
16
17
Symbol table '.dynsym' contains 8 entries:
   Num:    Value          Size Type    Bind   Vis      Ndx Name
     .....
     2: 0000000000000000     0 FUNC    GLOBAL DEFAULT  UND clock_gettime@GLIBC_2.17 (2)
     3: 0000000000000000     0 FUNC    GLOBAL DEFAULT  UND printf@GLIBC_2.2.5 (3)
     ......

Version symbols section '.gnu.version' contains 8 entries:
 Addr: 0x0000000000000526  Offset: 0x000526  Link: 6 (.dynsym)
  000:   0 (*local*)       0 (*local*)       2 (GLIBC_2.17)    3 (GLIBC_2.2.5)
  ......

Version needs section '.gnu.version_r' contains 1 entry:
 Addr: 0x0000000000000538  Offset: 0x000538  Link: 7 (.dynstr)
  000000: Version: 1  File: libc.so.6  Cnt: 2
  0x0010:   Name: GLIBC_2.2.5  Flags: none  Version: 3
  0x0020:   Name: GLIBC_2.17  Flags: none  Version: 2

问题在于修改 .gnu.version_r 段偏移 0x0020 的相关值。回顾 Elfxx_Vernaux 结构:

1
2
3
4
5
6
7
typedef struct {
    Elfxx_Word    vna_hash;  // 库名称 (如 GLIBC_2.17) 的 hash 值
    Elfxx_Half    vna_flags;
    Elfxx_Half    vna_other; // .gnu.version 段中符号的版本值
    Elfxx_Word    vna_name;  // 库名称 (如 GLIBC_2.17) 为相对 .dynstr 段偏移
    Elfxx_Word    vna_next;  // 下一条记录相对本记录首地址的偏移
} Elfxx_Vernaux;

实际仅须修改 vna_hashvna_name ,前者实为后者的校验和。

以下提供 2 种方法修改 hello 二进制文件,使其无须重编译就能运行于 RHEL/CentOS 6 中。

通过 dd 修改

1
2
3
4
5
# 复制 hello 偏移 0x538 + 0x10 = 0x548 的 4 byte 至文件 glibc225_vna_hash ;
dd if=hello of=glibc225_vna_hash skip=$((16#548)) bs=1 count=4

# 复制 hello 偏移 0x538 + 0x10 + 0x08 = 0x550 的 4 byte 至文件 glibc225_vna_hash
dd if=hello of=glibc225_vna_name skip=$((16#550)) bs=1 count=4
  • 0x538.gnu.version_r 段首地址。
  • 0x10GLIBC_2.2.5 记录的段偏移,即 Elfxx_Vernaux::vna_hash 偏移。
  • 0x08GLIBC_2.2.5 记录内 Elfxx_Vernaux::vna_name 偏移。

为保持 hello 不改变, 修改 hellohello-dd

1
2
3
4
5
6
7
cp hello hello-dd

# 复制 glibc225_vna_hash 至 hello-dd 偏移 0x530 + 0x20 = 0x558
dd if=glibc225_vna_hash of=hello-dd seek=$((16#558)) bs=1 conv=notrunc

# 复制 glibc225_vna_name 至 hello-dd 偏移 0x530 + 0x20 + 0x08 = 0x560
dd if=glibc225_vna_name of=hello-dd seek=$((16#560)) bs=1 conv=notrunc
  • 0x20GLIBC_2.1.7 记录的段偏移,即 Elfxx_Vernaux::vna_hash 偏移。
  • 0x08GLIBC_2.1.7 记录内 Elfxx_Vernaux::vna_name 偏移。

通过 readelf -sV hello 观察修改是否生效:

1
2
3
4
5
6
7
8
9
10
11
12
13
14
15
16
17
Symbol table '.dynsym' contains 8 entries:
   Num:    Value          Size Type    Bind   Vis      Ndx Name
     ......
     2: 0000000000000000     0 FUNC    GLOBAL DEFAULT  UND clock_gettime@GLIBC_2.2.5 (2)
     3: 0000000000000000     0 FUNC    GLOBAL DEFAULT  UND printf@GLIBC_2.2.5 (3)
     ......

Version symbols section '.gnu.version' contains 8 entries:
 Addr: 0x0000000000000526  Offset: 0x000526  Link: 4 (.dynsym)
  000:   0 (*local*)       0 (*local*)       2 (GLIBC_2.2.5)   3 (GLIBC_2.2.5)
  ......

Version needs section '.gnu.version_r' contains 1 entry:
 Addr: 0x0000000000000538  Offset: 0x000538  Link: 26 (.dynstr)
  000000: Version: 1  File: libc.so.6  Cnt: 2
  0x0010:   Name: GLIBC_2.2.5  Flags: none  Version: 3
  0x0020:   Name: GLIBC_2.2.5  Flags: none  Version: 2

最后,将 librt.so.1 添加至 hello-dd 的库依赖列表中。

1
patchelf --add-needed librt.so.1 hello-dd

通过 LIEF

LIEF 是一个能分析和修改 ELF , PE , MachO 和 Android 格式的库,它提供了 C/C++ 和 Python 的 API.

以下通过 LIEF 的 Python API 达到上述同样的效果。

安装

1
pip3 install lief

写脚本

创建 lief-hello.py :

1
2
3
4
5
6
7
8
9
10
11
12
13
14
15
16
17
18
19
20
import lief


binary = lief.parse('hello')
glibc225_aux = clock_gettime_aux = None

for i in binary.imported_symbols:
    # 查找 GLIBC_2.2.5 的 symbol_version_auxiliary 记录,
    if i.symbol_version.symbol_version_auxiliary.name == 'GLIBC_2.2.5':
        glibc225_aux = i.symbol_version.symbol_version_auxiliary
    # 查找 clock_gettime 的 symbol_version_auxiliary 记录,
    elif i.name == 'clock_gettime':
        clock_gettime_aux = i.symbol_version.symbol_version_auxiliary

# 复制 GLIBC_2.2.5 记录 name 和 hash 至 clock_gettime 记录对应字段中。
if glibc225_aux and clock_gettime_aux:
    clock_gettime_aux.name = glibc225_aux.name
    clock_gettime_aux.hash = glibc225_aux.hash
    binary.add_library('librt.so.1')  # 相当于 patchelf --add-needed librt.so.1
    binary.write('hello-lief')

以上 symbol_version_auxiliary 相当于前述 Elfxx_Vernaux

执行脚本

执行 python3 lief-hello.py 将生成 hello-lief

通过 readelf -sV hello-lief 观察修改是否生效:

1
2
3
4
5
6
7
8
9
10
11
12
13
14
15
16
17
Symbol table '.dynsym' contains 8 entries:
   Num:    Value          Size Type    Bind   Vis      Ndx Name
     ......
     2: 0000000000000000     0 FUNC    GLOBAL DEFAULT  UND clock_gettime@GLIBC_2.2.5 (2)
     3: 0000000000000000     0 FUNC    GLOBAL DEFAULT  UND printf@GLIBC_2.2.5 (3)
     ......

Version symbols section '.gnu.version' contains 8 entries:
 Addr: 0x0000000000002526  Offset: 0x002526  Link: 6 (.dynsym)
  000:   0 (*local*)       0 (*local*)       2 (GLIBC_2.2.5)   3 (GLIBC_2.2.5)
  ......

Version needs section '.gnu.version_r' contains 1 entry:
 Addr: 0x0000000000002538  Offset: 0x002538  Link: 7 (.dynstr)
  000000: Version: 1  File: libc.so.6  Cnt: 2
  0x0010:   Name: GLIBC_2.2.5  Flags: none  Version: 3
  0x0020:   Name: GLIBC_2.2.5  Flags: none  Version: 2

CentOS 8 上安装 LXC

| Comments

一、安装 LXC 包

1
2
3
yum install -y epel-release
yum update -y
yum install -y lxc lxc-devel lxc-templates dnsmasq iptables debootstrap
  • epel-release : Extra Packages for Enterprise Linux (EPEL) 仓库配置文件,因 EPEL 才包含 LXC 相关包。
  • dnsmasqiptables 为后续配置 LXC 网络。
  • debootstrap 为后续安装 Ubuntu 容器。

安装 LXC 模板

1
2
3
4
5
yum install -y gcc make
wget -O- https://linuxcontainers.org/downloads/lxc/lxc-templates-3.0.4.tar.gz | tar zx
cd lxc-templates-3.0.4
./configure --prefix=/usr --localstatedir=/var
make install
  • 虽然 lxc-templates 包,但该包未包含 Ubuntu 容器模板。故还须从其源码安装。
  • lxc-templates-3.0.4 并不需要编译任何 C 程序,但 configure 将检查 gcc。故须安装 gcc
  • 安装模板后,若不需要 gccmake ,则可自行 卸载

二、配置 LXC 网络

LXC 存在 3 种网络:

虚拟网络

创建虚拟网卡 lxcbr0 ,作为容器虚拟网络的网桥:

1
2
3
4
5
6
7
8
9
echo 'USE_LXC_BRIDGE="true"' > /etc/sysconfig/lxc
systemctl enable --now lxc-net.service
systemctl start lxc-net

cat > /etc/lxc/default.conf <<EOF
lxc.net.0.type = veth
lxc.net.0.flags = up
lxc.net.0.link = lxcbr0
EOF

共享 host 网络

1
echo 'lxc.net.0.type = none' > /etc/lxc/default.conf

因容器与 host 在同一网络名字空间,容器中进程监听端口不能与 host 中端口相同,否则监听失败,如 sshd

loopback 网络

1
echo 'lxc.net.0.type = empty' > /etc/lxc/default.conf

默认不配置或如上述,容器仅存在 loopback 网络。

三、创建容器

以安装 Ubuntu 20.04 容器为例:

1
2
3
4
lxc-create -n focal -t ubuntu \
  -- -r focal \
  --mirror http://cn.archive.ubuntu.com/ubuntu/ \
  --security-mirror http://cn.archive.ubuntu.com/ubuntu/
  • -n :容器名。
  • -t :模板名,对应 /usr/share/lxc/templates/lxc-* 文件。
  • -- :其后为传入 /usr/share/lxc/templates/lxc-ubuntu 的参数。
  • -r : Ubuntu 发行代号,默认为主机的 Ubuntu 发行代号,否则为最近 LTS
  • --mirror--security-mirror :为加速创建,两者设置为国内镜像。

其它参数:

  • -u <user> : 容器用户名,默认 ubuntu
  • --password <password> :容器密码,默认 ubuntu
  • -S <keyfile> : SSH 私钥文件。

其它模板,如 CentOS ,可通过 /usr/share/lxc/templates/lxc-centos -h 查看相关参数。

四、启动容器

1
lxc-start focal

登录

1
lxc-console focal

五、查看容器

1
lxc-info focal

输出形如:

1
2
3
4
5
6
7
8
9
10
11
12
Name:           focal
State:          RUNNING
PID:            26063
IP:             <container ip>
CPU use:        0.35 seconds
BlkIO use:      26.36 MiB
Memory use:     21.13 MiB
KMem use:       0 bytes
Link:           vethJI5UF9
 TX bytes:      1.51 KiB
 RX bytes:      2.18 KiB
 Total bytes:   3.68 KiB

六、端口转发

仅以将主机端口 2222 重定向至容器 22 为例(须将 <container ip> 替换为容器 IP )。

以下两者取其一,若未安装 firewalld ,则采用 iptables

iptables

1
iptables -t nat -A PREROUTING -p tcp -i lxcbr0 --dport 2222 -j DNAT --to-destination <container ip>:22

将上述命令写入 /etc/rc.local ,从而保证重启依旧生效:

1
echo 'iptables -t nat -A PREROUTING -p tcp -i lxcbr0 --dport 2222 -j DNAT --to-destination <container ip>:22' > /etc/rc.local

firewalld

1
2
3
firewall-cmd --zone=public --add-forward-port=port=2222:proto=tcp:toport=22:toaddr=<container ip> --permanent
firewall-cmd --zone=public --add-port=2222/tcp --permanent
firewall-cmd --reload

七、参考

Fail2Ban 简介 (一)

| Comments

Fail2Ban 是入侵检测软件框架,保护计算机免受暴力破解(brute-force attack)。以 Python 语言编写,能运行于具有包(packet)控制或防火墙的 POSIX 系统,如 iptables 或 TCP Wrapper.

鉴于互联网针对 VPS 暴力破解 SSH 越来越频繁,以下以 Ubuntu 为例,介绍如何利用 Fail2Ban 有效禁止 SSH 破解。

一、安装

1
sudo apt-get install -y fail2ban

二、配置

Fail2Ban 配置文件格式 INI,存于 /etc/fail2ban 目录:

  • fail2ban.conf : fail2ban 程序运行的日志和数据库等参数。
  • jail.conf : 禁止(ban)相关参数。
  • filter.d/* : jail.conf 中涉及“节”(section,如 [sshd] )的过滤器,由正则表达式构成。
  • action.d/* : jail.conf 中涉及“节”(section,如 [sshd] )的处理器。

它们皆为安装文件,直接修改将导致后续升级 无法自动合并 配置文件。Fail2Ban 提供了自定义配置文件的机制:

  • fail2ban.conf 可依此通过 fail2ban.d/*fail2ban.local 来重定义相关选项。
  • jail.conf 可依此通过 jail.d/*jail.local 来重定义相关选项。

默认安装,/etc/fail2ban/jail.d/defaults-debian.conf 已启用 sshd 的 jail

通常,除 jail.conf 外,不需要改变配置。以下着重介绍 jail.conf 中的参数,它们不仅是默认(全局)参数(隶属于 [DEFAULT]),而且可在具体 jail 中重定义(如 [sshd])。

常用参数

  • ignoreip : 忽略不 IP 地址(CIDR 格式)或机器名,以空格分隔。
  • bantime : 主机被禁止时长,默认 600 秒。
  • maxretry : 在 findtime 时间窗口中,允许主机认证失败次数。达到最大次数,主机将被禁止。
  • findtime : 查找主机认证失败的时间窗口。 不意味 着每隔 findtime 时间扫描一次日志。

高版本 Fail2ban 支持 s (秒), m (分)和 d (天)作为时间单位,如 10m1d

backend

默认 auto ,支持 4 种文件修改的监控后端:

  • pynotify : inotify 的 Python 绑定。在 Debian/Ubuntu 中,对应 python3-pyinotify 包。
  • gamin : KDE 和 GNOME 等桌面使用的文件监控系统,通常基于 inotify 实现。 在 Debian/Ubuntu 中,对应 gamin 包。
  • polling : 周期性扫描相关系统日志。相对于其它几种后端,或将占用 更多 CPU 时间。
  • systemd : 通过 Systemd 的 Python 绑定来访问 systemd 日志,logpath 将无效。 在 Debian/Ubuntu 中,对应 python3-systemd 包。
  • auto : 依此尝试 pyinotify , gaminpolling

通常,在安装 fail2ban 安装包时,将自动安装 iptables , whois , python3-pyinotifypython3-systemd ,即启用 pyinotify 后端。除非 APT 配置 APT::Install-Recommends "false"; (如:/etc/apt/apt.conf)或 --no-install--recommends

最佳实践

建议将 bantime 设为 86400 (即 1 天)。如 jail.local :

1
2
3
4
[DEFAULT]
bantime = 86400
findtime = 600
maxretry = 3

1
2
3
4
[sshd]
bantime = 86400
findtime = 600
maxretry = 3

修改后,须重载 fail2ban

1
sudo service fail2ban reload

/var/log/fail2ban.log 将出现类似:

1
2
3
4
5
6
7
8
9
10
11
12
13
14
15
16
17
18
19
20
21
2021-02-20 17:04:59,580 fail2ban.observer       [2615]: INFO    Observer start...
2021-02-20 17:04:59,583 fail2ban.database       [2615]: INFO    Connected to fail2ban persistent database '/var/lib/fail2ban/fail2ban.sqlite3'
2021-02-20 17:04:59,583 fail2ban.jail           [2615]: INFO    Creating new jail 'sshd'
2021-02-20 17:04:59,593 fail2ban.jail           [2615]: INFO    Jail 'sshd' uses pyinotify {}
2021-02-20 17:04:59,596 fail2ban.jail           [2615]: INFO    Initiated 'pyinotify' backend
2021-02-20 17:04:59,597 fail2ban.filter         [2615]: INFO      maxLines: 1
2021-02-20 17:04:59,611 fail2ban.filter         [2615]: INFO      maxRetry: 3
2021-02-20 17:04:59,611 fail2ban.filter         [2615]: INFO      findtime: 600
2021-02-20 17:04:59,611 fail2ban.actions        [2615]: INFO      banTime: 86400
2021-02-20 17:04:59,611 fail2ban.filter         [2615]: INFO      encoding: UTF-8
2021-02-20 17:04:59,611 fail2ban.filter         [2615]: INFO    Added logfile: '/var/log/auth.log' (pos = 34274, hash = 5cdc6285962a0352611a54aa860667fc35ededc1)
2021-02-20 17:04:59,614 fail2ban.jail           [2615]: INFO    Jail 'sshd' started
2021-02-20 17:08:12,674 fail2ban.server         [2615]: INFO    Reload all jails
2021-02-20 17:08:12,674 fail2ban.server         [2615]: INFO    Reload jail 'sshd'
2021-02-20 17:08:12,674 fail2ban.filter         [2615]: INFO      maxLines: 1
2021-02-20 17:08:12,674 fail2ban.filter         [2615]: INFO      maxRetry: 3
2021-02-20 17:08:12,675 fail2ban.filter         [2615]: INFO      findtime: 600
2021-02-20 17:08:12,675 fail2ban.actions        [2615]: INFO      banTime: 86400
2021-02-20 17:08:12,675 fail2ban.filter         [2615]: INFO      encoding: UTF-8
2021-02-20 17:08:12,675 fail2ban.server         [2615]: INFO    Jail 'sshd' reloaded
2021-02-20 17:08:12,675 fail2ban.server         [2615]: INFO    Reload finished.

三、查看状态

1
sudo fail2ban-client status sshd

输出类似:

1
2
3
4
5
6
7
8
9
Status for the jail: sshd
|- Filter
|  |- Currently failed: 2
|  |- Total failed:     5343
|  `- File list:        /var/log/auth.log
`- Actions
   |- Currently banned: 178
   |- Total banned:     1354
   `- Banned IP list:   ...

列表 iptables 的规则:

1
iptables -S

输出类似:

1
2
3
4
5
6
7
8
9
10
-P INPUT ACCEPT
-P FORWARD ACCEPT
-P OUTPUT ACCEPT
-N fail2ban-ssh
-A INPUT -p tcp -m multiport --dports 22 -j fail2ban-ssh
-A fail2ban-nginx-http-auth -j RETURN
-A fail2ban-ssh -s <IP 1> -j REJECT --reject-with icmp-port-unreachable
-A fail2ban-ssh -s <IP 2> -j REJECT --reject-with icmp-port-unreachable
...
-A fail2ban-ssh -j RETURN

如何导入 Ubuntu 重复 Root 卷组

| Comments

场景

  • 某云平台的 Ubuntu 虚拟机运行中突遇挂起,重启时挂起于某阶段,且无法进入恢复模式。
  • 因该云平台限制或问题,无法通过 Ubuntu 安装 ISO 引导该虚拟机。
  • 该虚拟机的 root 分区位于 LVM 卷组上。

当时,基本思路为挂载问题虚拟机的虚拟盘至新虚拟机,通过后者导入原虚拟盘的卷组,从而备份出重要数据。

然而,恰好该云平台仅有该虚拟机的原始模板,新实例的虚拟盘与旧盘:

  • PV UUID 重复
  • VG UUID 和名称重复

导致无法激活旧卷组。

办法

以下以 VirtualBox 安装 Ubuntu 20.04 虚拟机,克隆其系统盘为新虚拟盘,并将新盘加入该虚拟机来模拟场景。

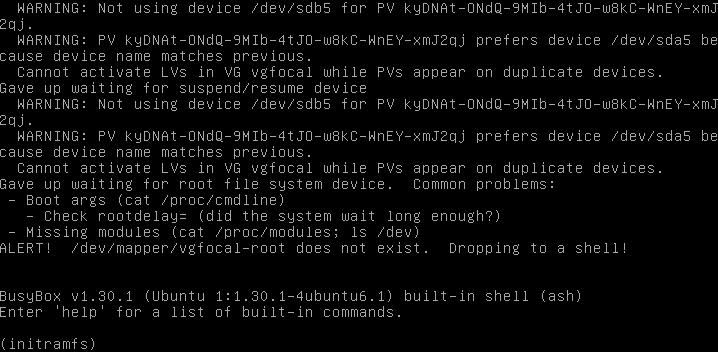
启动系统

启动虚拟机将遇到 重复 PV 错误:

Boot Ubuntu 20.04 duplicate root VG

进入 initramfs shell ,为了避免激活 root 卷组失败,暂时删除 /dev/sdb

1
2
3
echo 1 > /sys/block/sdb/device/delete
vgchange -ay
exit

将正常进入系统。

扫描 /dev/sdb

登录系统,切换 root 用户, 重新扫密 /dev/sdb

1
echo '- - -' > /sys/class/scsi_host/host1/scan

查看内核日志:

1
dmesg | tail

可发现 /dev/sdb 被加入系统:

1
2
3
4
5
6
7
8
[  747.671254] scsi 1:0:0:0: Direct-Access     ATA      VBOX HARDDISK    1.0  PQ: 0 ANSI: 5
[  747.674322] sd 1:0:0:0: [sdb] 20971520 512-byte logical blocks: (10.7 GB/10.0 GiB)
[  747.674345] sd 1:0:0:0: [sdb] Write Protect is off
[  747.674350] sd 1:0:0:0: [sdb] Mode Sense: 00 3a 00 00
[  747.674382] sd 1:0:0:0: [sdb] Write cache: enabled, read cache: enabled, doesn't support DPO or FUA
[  747.678357] sd 1:0:0:0: Attached scsi generic sg1 type 0
[  747.681741]  sdb: sdb1 sdb2 < sdb5 >
[  747.681959] sd 1:0:0:0: [sdb] Attached SCSI disk

这里 /dev/sda 位于 SCSI host 0 ,而 /dev/sdb 位于 SCSI host 1 。实际环境中,若无法确定目标盘在第几个 host ,可全部扫描一遍:

1
2
3
for i in /sys/class/scsi_host/host*/scan; do
  echo '- - -' > $i
done

导入重复 VG

以新卷组名 ubuntu 执行 vgimportclone 导入重复 VG :

1
vgimportclone -n ubuntu /dev/sdb5

输出:

1
2
  WARNING: Not using device /dev/sdb5 for PV kyDNAt-ONdQ-9MIb-4tJO-w8kC-WnEY-xmJ2qj.
  WARNING: PV kyDNAt-ONdQ-9MIb-4tJO-w8kC-WnEY-xmJ2qj prefers device /dev/sda5 because device is used by LV.

/dev/sdb5 为新盘 VG 的 PV 。实际环境中,若 VG 存在多个 PV,则须全部作为该命令的参数。

激活新卷组

1
vgchange -ay

输出:

1
2
  2 logical volume(s) in volume group "ubuntu" now active
  2 logical volume(s) in volume group "vgfocal" now active

LXD简介(一)

| Comments

LXD 是基于LXC容器的管理程序(hypervisor),它由开发 Ubuntu 的公司 Canonical 创建和维护。

它由3个组建构成:

  • lxd :系统守护进程,它导出能被本地和网络访问的 RESTful API
  • lxc :客户端命令行,它能跨网络管理多个容器主机。
  • nova-compute-lxd : OpenStack Nova 插件,它使 OpenStack 如虚拟机一般,管理容器。

一、安装

因 Ubuntu 16.04 LXD 2.x 和 Ubuntu 18.04 LXD 3.x 版本都较旧,且 Ubuntu 20.04 放弃 apt 安装 LXD 。

请据 Snap简介 安装 LXD

为避免每次 sudo lxc ,可将 lxd 组加入当前(非root)用户的附加组:

1
sudo usermod -aG lxd $USER

二、初始化

1
sudo lxd init

输出:

1
2
3
4
5
6
7
8
9
10
11
12
13
14
15
16
17
18
19
20
Would you like to use LXD clustering? (yes/no) [default=no]:

# 配置存储池
Do you want to configure a new storage pool? (yes/no) [default=yes]:
Name of the new storage pool [default=default]:
Name of the storage backend to use (btrfs, dir, lvm, zfs, ceph) [default=zfs]: dir

Would you like to connect to a MAAS server? (yes/no) [default=no]:

# 创建虚拟网络
Would you like to create a new local network bridge? (yes/no) [default=yes]:
What should the new bridge be called? [default=lxdbr0]:
What IPv4 address should be used? (CIDR subnet notation, “auto” or “none”) [default=auto]:
What IPv6 address should be used? (CIDR subnet notation, “auto” or “none”) [default=auto]:

# LXD 服务的网络配置
Would you like LXD to be available over the network? (yes/no) [default=no]: yes
Address to bind LXD to (not including port) [default=all]:
Port to bind LXD to [default=8443]:
Trust password for new clients:

参看: How to install LXD on Ubuntu

修改密码

1
lxc config set core.trust_password '<password>'

三、镜像

LXD 默认提供3个远程镜像:

  • ubuntu: Ubuntu 稳定版镜像
  • ubuntu-daily: Ubuntu 每日构建的镜像
  • images: 其它发行版本的镜像,主要包括:
    • Alpine
    • Archlinux
    • Centos/Oracle
    • Debian
    • Fedora
    • Gentoo
    • OpenSUSE
    • OpenWRT
    • Ubuntu

列表本地镜像

1
lxc image list

列表Ubuntu镜像

1
lxc image list ubuntu:

列表其他镜像

1
lxc image list images:

注册镜像

因上述镜像都在国外,复制镜像速度非常慢。可注册清华大学的镜像来加速使用:

1
lxc remote add tuna-images https://mirrors.tuna.tsinghua.edu.cn/lxc-images/ --protocol=simplestreams --public

以下主要以tuna-images为例。

复制镜像

1
lxc image cp tuna-images:ubuntu/20.04 local: --copy-aliases --auto-update --public
  • --copy-aliases : 复制所有镜像别名。 每个镜像可能有多个别名,如 Ubuntu 20.04 的镜像的别名为 20.04focal 等。
  • --auto-uppdate : 自动更新镜像
  • --public : 公开镜像,让其它机器可以复制它。后面将进一步介绍如何公开 LXD 端口。

四、容器

创建容器,但不启动

默认为 64-bit 容器:

1
lxc init tuna-images:ubuntu/20.04 focal

若须 32-bit 容器,则

1
lxc init tuna-images:ubuntu/20.04/i386 focal

创建容器,并启动容器

1
lxc launch tuna-images:ubuntu/20.04 focal

相当于

1
2
lxc init tuna-images:ubuntu/20.04 focal
lxc start focal

直接从远程镜像初始化或启动,存在如下缺点:

  • 每次初始化或启动,可能会从远程下载镜像(若存在更新),造成初始化或启动速度缓慢。
  • 未复制任何别名至本地,不利于复用。如 lxc image ls
1
2
3
4
5
+-----------------------+--------------+--------+--------------------------------------+--------------+-----------+---------+-----------------------------+
|         ALIAS         | FINGERPRINT  | PUBLIC |             DESCRIPTION              | ARCHITECTURE |   TYPE    |  SIZE   |         UPLOAD DATE         |
+-----------------------+--------------+--------+--------------------------------------+--------------+-----------+---------+-----------------------------+
|                       | 36e7b3c6bdea | yes    | Ubuntu focal amd64 (20200504_07:42)  | x86_64       | CONTAINER | 97.40MB | May 5, 2020 at 8:07am (UTC) |
+-----------------------+--------------+--------+--------------------------------------+--------------+-----------+---------+-----------------------------+

故最佳实践为首先复制镜像,然后初始化或启动:

1
2
lxc image cp tuna-images:ubuntu/20.04 local: --copy-aliases --auto-update --public
lxc launch ubuntu/20.04 focal

启动/停止容器

1
2
lxc start focal
lxc stop focal

列表容器

1
lxc list

或 快速列表

1
lxc list --fast

查看容器详细信息

1
lxc info focal

运行命令

1
sudo lxc exec focal -- /bin/bash

上传/下载文件

1
2
lxc file pull focal/etc/hosts .
lxc file push /etc/hosts focal/tmp/tmp

五、虚拟机

LXD 3.19 开始支持创建虚拟机:

简单的说,所有容器相关的命令加--vm

复制镜像

若类似复制容器命令:

1
lxc image copy tuna-images:ubuntu:20.04 local: --copy-aliases --auto-update --public --vm

则可能 覆盖 本地容器 ubuntu 20.04 的别名,造成后者 无别名

1
2
3
4
5
6
7
+-----------------------+--------------+--------+-------------------------------------+--------------+-----------------+----------+-----------------------------+
|         ALIAS         | FINGERPRINT  | PUBLIC |             DESCRIPTION             | ARCHITECTURE |      TYPE       |   SIZE   |         UPLOAD DATE         |
+-----------------------+--------------+--------+-------------------------------------+--------------+-----------------+----------+-----------------------------+
| ubuntu/focal (7 more) | 1bb3c2f730c5 | yes    | Ubuntu focal amd64 (20200504_07:42) | x86_64       | VIRTUAL-MACHINE | 231.06MB | May 5, 2020 at 8:08am (UTC) |
+-----------------------+--------------+--------+-------------------------------------+--------------+-----------------+----------+-----------------------------+
|                       | 36e7b3c6bdea | yes    | Ubuntu focal amd64 (20200504_07:42) | x86_64       | CONTAINER       | 97.40MB  | May 5, 2020 at 8:07am (UTC) |
+-----------------------+--------------+--------+-------------------------------------+--------------+-----------------+----------+-----------------------------+

为了避免上述问题,自定义镜像别名,如以 vm/ 作为镜像别名前缀:

1
lxc cpi tuna-images:ubuntu/20.04 local: --auto-update --public --vm --alias vm/ubuntu/focal --alias vm/ubuntu/20.04

创建虚拟机

1
lxc launch tuna-images:ubuntu/20.04 focal-vm --vm --profile default --profile vm

Ubuntu 16.04 默认内核 4.4 ,将遇到

1
2
3
4
Creating focal-vm
Starting focal-vm
Error: Failed to run: modprobe vhost_vsock: modprobe: FATAL: Module vhost_vsock not found in directory /lib/modules/4.4.0-176-generic
Try `lxc info --show-log local:focal-vm` for more info

须安装 4.15 (HWE) 内核,并重启:

1
sudo apt-get install --install-recommends linux-generic-hwe-16.04

六、快照

创建只读快照

1
lxc snapshot focal focal-s0

注:无列表快照的直接操作,只能通过获取容器的详细信息 lxc info 来获取的快照名字。

还原快照

1
lxc restore focal focal-s0

删除快照

1
lxc delete focal/focal-s0

七、别名

创建别名

模仿 Docker 删除镜像的 docker rmi , 创建 lxc rmi

1
lxc alias add rmi 'image rm'

类似:

1
2
3
lxc alias add lsi 'image ls'
lxc alias add cpi 'image cp'
lxc alias add infoi 'image info'

列表别名

1
lxc alias ls

删除别名

1
lxc alias rm infoi

八、剖析

lxd将数据存放于 /var/snap/lxd/common/lxd

  • images: 存放镜像文件
  • lxc: 存放容器
  • lxd.db:lxd元数据数据库,基于sqlite3
  • server.crt:服务器证书
  • server.key:服务器密钥
  • unix.socket:lxd监听的本地套接口

参考

Snap简介

| Comments

Snap 是 Canonical 开发的包管理系统,默认安装于 Ubuntu 16.04 及其后的发行版本中。

优势:

  • 自包含:不受限于发行版的系统库版本,且每个包之间不存在运行库依赖。
  • 只读挂载:应用程序不能修改或删除,且不会污染系统应用程序或库。
  • 回退:内置回退旧版本。
  • 快照:内置备份和恢复应用数据。
  • 版本新:相比发行版更新缓慢,其应用程序版本都比较新。

劣势主要为安装包占用较多存储空间。

以下主要以 LXD 的 snap 包为例。

一、安装 snapd

1
sudo apt install -y snapd

查看版本

1
snap version

二、安装 snap 包

为避免系统可能存在旧版本 LXD 与 snap 安装的最新版 LXD 冲突:

1
sudo apt remove --purge lxd lxd-client

然后:

1
sudo snap install lxd

默认 stable 频道,也可以指定 edge 频道:

1
sudo snap install --channel=edge lxd

安装后,可切换频道。

1
sudo snap switch --channel=stable lxd

相比 RPM 和 Debian 包需手动更新,snap 包将在后台自动更新。若需手动更新,则

1
sudo snap refresh lxd

snap 还能切换频道并更新

1
sudo snap refresh --channel=beta lxd

snap 应用程序位于 /snap/bin ,如: /snap/bin/lxd

为便于使用,可将该路径追加于 ~/.bashrc~/.zshrc 环境变量 PATH ,如:

1
export PATH=$PATH:/snap/bin

下载包

1
snap download lxd

离线安装

1
2
sudo snap ack lxd_17320.assert
sudo snap install lxd_17320.snap

三、搜索包

1
snap search <snapname>

也可通过浏览器在应用市场 Snapcraft 上搜索需要的包(应用)。

四、列表已安装的包

列表所有包

1
snap list

输出:

1
2
3
4
Name      Version    Rev    Tracking       Publisher   Notes
core      16-2.44.3  9066   latest/stable  canonical✓  core
core18    20200311   1705   latest/stable  canonical✓  base
lxd       4.0.1      14804  latest/stable  canonical✓  -

--all , 则列表包的所有版本 (revision)

列表指定包

1
snap list lxd

输出:

1
2
Name  Version  Rev    Tracking       Publisher   Notes
lxd   4.0.1    14804  latest/stable  canonical✓  -

五、回退版本

1
sudo snap revert lxd

若遇到当前版本bug,则可考虑回退程序。当前跟踪的 channel 不会因上一版本源于不同 channel 而改变。

  • snap refesh 不会更新已回退的包,除非指定包名,如:snap refresh lxd
  • 新版本发布,将继续自动更新已回退的包。

六、卸载 snap 包

1
sudo snap remove lxd

卸载旧版本(释放空间)。

1
sudo snap remove --revision=14709 lxd

七、启用/禁用 snap 包

为避免卸载和重装而禁用:

1
sudo snap disable lxd

反之:

1
sudo snap enable lxd

八、服务

列表

1
sudo snap services lxd

输出:

1
2
3
Service       Startup  Current   Notes
lxd.activate  enabled  inactive  -
lxd.daemon    enabled  active    socket-activated

启动、停止和重启

1
2
3
sudo snap stop lxd.daemon
sudo snap start lxd.daemon
sudo snap restart lxd.daemon

停止服务,并禁用自动启动:

1
sudo snap stop --disable lxd.daemon

开始服务,并启用自动启动:

1
sudo snap start --disable lxd.daemon

查看日志

1
2
3
sudo snap logs lxd
sudo snap logs lxd.daemon
sudo snap logs lxd -f # 类似tail -f

九、快照

创建

1
sudo snap save

输出:

1
2
3
4
Set  Snap      Age    Version    Rev    Size    Notes
1    core      42.2s  16-2.44.3  9066     124B  -
1    core18    42.2s  20200311   1705     123B  -
1    lxd       42.2s  4.0.1      14890   2187B  -

或指定包

1
sudo snap save lxd

--no-wait, 则后台运行。

列表

1
snap saved

或指定Set ID

1
snap saved --id=1

校验

1
snap check-snapshot 1

还原

1
snap restore 1

删除

1
snap forget 1

十、剖析

包的安装

相比 RPM 和 Debian 等传统安装包,通过解开来安装。

存于 /var/lib/snapd ,格式为 squashfs 的 snap 包,不直接解开,而是(只读)挂载至 /snap/<snapname>/<revision> 目录。如:

lxd 的 revision 14890 的包存储于 /var/lib/snapd/snaps/lxd_14890.snap :

1
mount | grep 14890

发现:

1
/var/lib/snapd/snaps/lxd_14890.snap on /snap/lxd/14890 type squashfs (ro,nodev,relatime)

另外, /snap/<snapname>/current 为当前版本挂载点,它为指向 /snap/<snapname>/<revision> 的符号链接。

而且,每个 snap 包含了不依赖系统库的完整的运行时库。

包的缓存

snap 为了加速二次安装,首次安装会将 snap 包缓存至 /var/lib/snapd/cache

目前为止, snap 未提供命令清楚缓存。若需 释放空间 ,须手动删除该目录中的文件。

包的运行数据

/var/snap 存储每个包的运行数据(或元数据)。如:/var/snap/lxd 主要为 lxd 的元数据。

该目录或将消耗大量的存储空间,因受制于 AppArmor ,不能通过移动目录(至另外分区)和符号链接来释放空间,须 mount --bind 移动的目录。

包的应用程序

/snap/bin 存储指向包的应用程序(符号链接),如:

1
ls -l /snap/bin/lxd

看到 lxd 仅为 snap 的符号链接

1
lrwxrwxrwx 13 root 29 4月  12:10 /snap/bin/lxd -> /usr/bin/snap

快照

每个包快照用独立的 zip 文件存储,包含:

  • meta.json : 描述快照内容、配置和校验码。
  • archive.tgz : 包含系统数据。
  • user/<username>.tgz : 包含每个系统的用户数据。

快照存储于 /var/lib/snapd/snapshots

参考

用ACE实现One Loop Per Thread

| Comments

one loop per thread 即每个线程运行一个独立的事件循环 (event loop),或称为 one event loop per thread 更准确。而且事件循环线程之间通常不存在同步或互斥的关系, 并发连接的处理能力随CPU核心数而扩展 (scalable)。

ACE 拥有多种实现的Reactor:

  • ACE_Select_Reactor : 基于 select 的实现。
  • ACE_Dev_Poll_Reactor : 基于 Linux epoll 或 BSD /dev/poll 的实现。
  • ACE_WFMO_Reactor : 基于 Windows WaitForMultipleObjects 的实现

它们都可用于实现 one loop per thread 模式。 相比 ACE_TP_Reactor

  • ACE_TP_Reactor 继承于 ACE_Select_Reactor加锁 保证多线程竞争同一 Reactor 的安全。并行可扩展能力受限,且最大支持 1024 个描述符。
  • 基于 ACE_Dev_Poll_Reactor 的 one loop er thread,每个线程拥有独立的 Reactor,线程之间不存在竞争。充分发挥并行能力,且最大支持几十万甚至百万个描述符。

以下以 ACE_Select_Reactor 为例浅析实现的关键代码。更完备示例代码请参看我的 ace_echod

实现浅析

事件循环函数

event_loop 将作为线程函数运行于独立线程中,它与 ACE 教科书基本一样:

1
2
3
4
5
6
7
8
9
ACE_THR_FUNC_RETURN event_loop(ACE_Reactor* reactor)
{
    reactor->owner(ACE_OS::thr_self()); // 将reactor “绑定” 本线程。
    while (!reactor->reactor_event_loop_done()) {
        reactor->run_reactor_event_loop();
    }

    return 0;
}

事件循环管理器

1
2
3
4
5
6
7
8
9
10
11
12
13
14
15
16
17
18
19
20
21
22
23
24
25
26
27
28
29
30
31
32
33
34
35
36
37
38
39
40
class Event_Loop_Manager {
public:
    // 为简化,忽略 ctor 、dtor 和 close

    bool open(unsigned threads)
    {
        // 创建Reactor数组。
        reactors_.reset(new ACE_Reactor*[threads]);
        memset(reactors_.get(), 0, sizeof(ACE_Reactor*) * threads);

        // 创建线程ID数组
        tids_.reset(new ACE_thread_t[threads]);
        memset(tids_.get(), 0, sizeof(ACE_thread_t*) * threads);

        // 创建事件循环
        threads_ = threads;
        for (unsigned i = 0; i < threads_; ++i) {
            reactors_[i] = new ACE_Reactor(new ACE_Select_Reactor, 1), false);
            ACE_Thread_Manager::instance()->spawn(
                    (ACE_THR_FUNC) event_loop, reactors[i],
                    THR_NEW_LWP | THR_JOINABLE | THR_INHERIT_SCHED, &tid);
        }

        current_ = 0;
        return true;
    }

    /// 以简单循环方式返回 Reactor
    ACE_Reactor* reactor()
    {
        ACE_Reactor* r = reactors_[current_];
        current_ = (current_ + 1) % threads_;
        return r;
    }
protected:
    ACE_Auto_Basic_Array_Ptr<ACE_Reactor*> reactors_;
    ACE_Auto_Basic_Array_Ptr<ACE_thread_t> tids_;
    unsigned threads_;
    unsigned current_; // 当前分配 Reactor 索引
};

Echo Acceptor

据 ACE 的 Acceptor 模式, Echo_Handler 继承于 ACE_Svc_Handler<ACE_SOCK_STREAM, ACE_NULL_SYNCH>,它与 ACE 教科书实现相似。

  • Echo_Acceptor 注册默认 Reactor ,其事件循环运行于主线程。
  • 创建 Echo_Handler 对象时,事件循环管理器以简单循环方式分配 Reactor 给新对象。
1
2
3
4
5
6
7
8
9
10
11
12
13
14
15
16
17
18
19
20
21
22
23
24
25
26
27
28
29
30
31
32
33
34
35
class Echo_Acceptor: public ACE_Acceptor<Echo_Handler, ACE_SOCK_ACCEPTOR> {
public:
    int open(const addr_type& local_addr, int flags, int use_select, int reuse_addr)
    {
        flags_ = flags;
        use_select_ = use_select;
        reuse_addr_ = reuse_addr;
        peer_acceptor_addr_ = local_addr;

        if (peer_acceptor_.open(local_addr, reuse_addr) == -1)
            return -1;

        (void) peer_acceptor_.enable(ACE_NONBLOCK);
        ACE_Reactor::instance()->register_handler(
            this, ACE_Event_Handler::ACCEPT_MASK);

        this->reactor(ACE_Reactor::instance());

        // 按逻辑CPU数初始化事件循环(线程)数。
        return loops_.open(reactor_type, ACE_OS::num_processors()) ? 0 : -1;
    }

    virtual int make_svc_handler(handler_type*& sh)
    {
        if (!sh)
            ACE_NEW_RETURN(sh, handler_type, -1);

        // 事件循环管理器给 Echo_Handler 对象分配事件循环。
        sh->reactor(loops_.reactor());
        return 0;
    }

protected:
    Event_Loop_Manager loops_;
};

存在问题

  • ACE_Reactor::size 实现不一致,除 ACE_Dev_Poll_Reactor 返回当前注册的 handler 数量,其它实现返回handler表的容量。导致无法直接通过注册 handler 的数量,实现 Round-Robin,即均衡分配 handler
  • ACE_Reactor 无法获取当前是否等待事件(即空闲)状态,导致无法直接将 handler 分配到空闲事件循环中。

解决上述问题,要么直接修改 ACE 的实现,要么在具体 handler 实现中增加状态或统计变量,两者都需用原子变量来避免加锁。

安全远程访问Docker

| Comments

Docker服务端(dockerd)默认监听在Unix套接口 /var/run/docker.sock 。仅能本地或SSH至Docker运行的主机访问,不利于自动化开发测试。

若需远程访问,得配置它同时监听在TCP端口(默认2376)。

然而,Docker不支持用户认证。 可通过配置TLS客户端和服务端认证,规避非法客户端远程访问服务端。

一、创建CA

1
2
openssl genrsa -out ca-key.pem 4096
openssl req -new -x509 -days 365 -key ca-key.pem -sha256 -out ca.pem

交互式输入各种选项,其中

1
Common Name (e.g. server FQDN or YOUR name) []: <HOST>

<HOST> 为Docker远程服务端域名(允许不存在的域名)。

二、创建远程服务端证书

创建 extfile.cnf

1
2
subjectAltName = DNS:<HOST>,IP:<IP>,IP:127.0.0.1
extendedKeyUsage = serverAuth
  • <HOST> 与上同。
  • <IP> 为Docker远程服务端IP

然后:

1
2
3
openssl genrsa -out server-key.pem 4096
openssl req -subj "/CN=<HOST>" -sha256 -new -key server-key.pem -out server.csr
openssl x509 -req -days 365 -sha256 -in server.csr -CA ca.pem -CAkey ca-key.pem -CAcreateserial -out server-cert.pem -extfile extfile.cnf

三、创建客户端证书

创建 extfile-client.cnf

1
extendedKeyUsage = clientAuth

然后:

1
2
3
openssl genrsa -out key.pem 4096
openssl req -subj '/CN=client' -new -key key.pem -out client.csr
openssl x509 -req -days 365 -sha256 -in client.csr -CA ca.pem -CAkey ca-key.pem -CAcreateserial -out cert.pem -extfile extfile-client.cnf

至此,删除中间文件,并降低相关密钥访问权限。

1
2
3
rm -f client.csr server.csr extfile.cnf extfile-client.cnf
chmod 0400 ca-key.pem key.pem server-key.pem
chmod 0444 ca.pem server-cert.pem cert.pem

四、远程复制服务端相关证书

通过scp,将 ca.pem, server-cert.pemserver-key.pem 复制至远程服务端 /etc/docker 目录中。

注:ca-key.pem 不应复制至远程服务端。因既不意义,又增大泄漏可能性。

五、编辑远程服务端 /etc/docker/daemon.json

1
2
3
4
5
6
7
8
{
    "hosts": ["unix:///var/run/docker.sock", "tcp://0.0.0.0:2376"],
    "tls": true,
    "tlscacert": "/etc/docker/ca.pem",
    "tlscert": "/etc/docker/server-cert.pem",
    "tlskey": "/etc/docker/server-key.pem",
    "tlsverify": true
}

为保证证书和密钥安全,须

1
2
sudo chown root.root /etc/docker/{ca,server-cert,server-key}.pem
sudo chmod og-rwx /etc/docker/{ca,server-cert,server-key}.pem

六、重启远程服务端Docker服务

/lib/systemd/system/docker.serviceExecStart 中, -H fd:///etc/docker/daemon.jsonhosts 冲突,将导致Docker服务启动失败。

若在 /lib/systemd/system/docker.service 中直接删除 -H fd:// ,docker-ce包升级将恢复原样。

可创建 /etc/systemd/system/docker.service.d/options.conf 及其父目录,并编辑

1
2
3
[Service]
ExecStart=
ExecStart=/usr/bin/dockerd --containerd=/run/containerd/containerd.sock

或执行如下命令:

1
2
3
4
5
6
7
8
9
10
sudo mkdir -p /etc/systemd/system/docker.service.d
sed -n '/\[Service\]/ {
    a \
ExecStart=
    p
}

/ExecStart=.*/ {
    s/-H fd:\/\/ //p
}' /lib/systemd/system/docker.service | sudo tee /etc/systemd/system/docker.service.d/options.conf

然后:

1
2
sudo systemctl daemon-reload
sudo systemctl restart docker

七、配置客户端

在客户端和CA相关证书和密钥所在目录,创建docker.env

1
2
3
export DOCKER_HOST=<HOST>:2376
export DOCKER_TLS_VERIFY=1
export DOCKER_CERT_PATH=`realpath \`dirname $0\``

在远程访问Docker前,载入该文件:

1
source <dir>/docker.env

然后,控制远程Docker与本地Docker类似,如:

1
docker images

参考

rbenv简介——Debian/Ubuntu中管理多版本Ruby

| Comments

一、安装

1
2
git clone git://github.com/rbenv/rbenv.git ~/.rbenv
git clone git://github.com/rbenv/ruby-build.git ~/.rbenv/plugins/ruby-build

在国内,为了加速下述安装:

1
git clone https://github.com/andorchen/rbenv-taobao-mirror.git ~/.rbenv/plugins/rbenv-taobao-mirror

激活rbenv

1
eval "$(~/.rbenv/bin/rbenv init)"

为了每次登录后自动激活rbenv,需将NMV_DIRnvm.sh和补齐加入bash的~/.bashrc(或zsh的~/.zshrc)

1
2
export PATH=~/.rbenv/shims:~/.rbenv/bin:$PATH
eval "$(rbenv init -)"

验证是否安装正确:

1
curl -fsSL https://github.com/rbenv/rbenv-installer/raw/master/bin/rbenv-doctor | bash

1
wget -qO- https://github.com/rbenv/rbenv-installer/raw/master/bin/rbenv-doctor | bash

输出类似:

1
2
3
4
5
6
7
8
Checking for `rbenv' in PATH: /root/.rbenv/bin/rbenv
Checking for rbenv shims in PATH: OK
Checking `rbenv install' support: /root/.rbenv/plugins/ruby-build/bin/rbenv-install (ruby-build 20190615-9-gf3f4193)
Counting installed Ruby versions: none
  There aren't any Ruby versions installed under `/root/.rbenv/versions'.
  You can install Ruby versions like so: rbenv install 2.2.4
Checking RubyGems settings: OK
Auditing installed plugins: OK

二、常用命令

列表可安装的Ruby版本

1
rbenv install -l

除了Ruby官方版本,还支持RBX和JRuby等。

安装指定版本的Ruby

安装过程,实际为下载并编译指定版本的Ruby源码,故需系统安装:

1
sudo apt-get install -y make gcc libssl-dev libreadline-dev zlib1g-dev

然后:

1
rbenv install 2.6.3

Ruby版本安装在 ~/.rbenv/versions 目录中。

卸载指定版本的Ruby

1
rbenv uninstall 2.6.3

设置shell的Ruby版本

1
rbenv shell 2.6.3

等同于

1
export RBENV_VERSION=2.6.3

清除RBENV_VERSION

1
rbenv shell --unset

三、升级

1
2
3
4
5
6
cd ~/.rbenv
git pull
cd ~/.rbenv/plugins/ruby-build
git pull
cd ~/.rbenv/plugins/rbenv-taobao-mirror
git pull

四、配置Systemd脚本

若Ruby程序须通过Systemd启动,则其Systemd脚本类似:

1
2
3
4
5
6
7
8
9
10
11
12
...

[Service]
...
User=<username>
Group=<group>
Environment="PATH=/home/<username>/.rbenv/shims:/home/<username>/.rbenv/bin:/sbin:/usr/sbin:/bin:/usr/bin"
Environment="RBENV_ROOT=/home/<username>/.rbenv"
Environment="RBENV_VERSION=<ruby version>"
WorkingDirectory=<app dir>
ExecStart=<app dir>/<app>
...
  • username 为服务运行的用户名,通常为 RBENV_ROOT 所属用户。
  • group 为服务运行的组名,通常为 RBENV_ROOT 所属组。
  • RBENV_VERSION 为Ruby版本号。
  • app dir 为Ruby程序的目录。
  • app 为Ruby程序或启动脚本。

五、制作Docker镜像

若不希望使用Ruby的官方Docker镜像,可利用rbenv创建镜像:

1
2
3
4
5
6
7
8
9
10
11
12
13
14
15
16
17
18
19
20
21
22
23
24
25
26
FROM ubuntu:bionic
MAINTAINER ...

ENV DEBIAN_FRONTEND noninteractive
ENV RBENV_ROOT /root/.rbenv
ENV RBENV_VERSION 2.6.3
ENV PATH $RBENV_ROOT/shims:$RBENV_ROOT/bin:$PATH
ENV RUBY_CFLAGS -O3

RUN set -eux; \
    apt-get update; \
    savedAptMark="$(apt-mark showmanual)"; \
    apt-get install -y git wget make gcc libssl-dev libreadline-dev zlib1g-dev; \
    echo "gem: --no-rdoc --no-ri" > ~/.gemrc; \
    git clone --depth 1 https://github.com/rbenv/rbenv.git $RBENV_ROOT; \
    git clone --depth 1 https://github.com/rbenv/ruby-build.git $RBENV_ROOT/plugins/ruby-build; \
    git clone --depth 1 https://github.com/andorchen/rbenv-taobao-mirror.git $RBENV_ROOT/plugins/rbenv-taobao-mirror; \
    CONFIGURE_OPTS="--disable-install-doc" MAKE_OPTS="-j`grep -c '^processor' /proc/cpuinfo`" rbenv install $RBENV_VERSION; \
    gem sources --add https://gems.ruby-china.com/ --remove https://rubygems.com/; \
    gem install bundler; \
    bundle config mirror.https://rubygems.com https://gems.ruby-china.com; \
    apt-mark auto '.*' > /dev/null; \
    [ -z "$savedAptMark" ] || apt-mark manual $savedAptMark; \
    apt-get purge -y --auto-remove -o APT::AutoRemove::RecommendsImportant=false; \
    apt-get clean; \
    rm -rf /var/lib/apt/lists /var/tmp/* /tmp/* $RBENV_ROOT/versions/*/lib/ruby/gems/*/cache/*.gem
  • 在国内,为了加速安装gem,上述gem和bundle设置国内镜像
  • RUBY_CFLAGS-O3 可编译优化的Ruby程序。在某些情况,可提高应用20-30%的运行效率。
  • 可针对指定C扩展(如ffi),设置编译优化标志:
1
bundle config build.ffi --with-cflags="$RUBY_CFLAGS"